Latest CVGC News
Retro Emulation and You
When you wake up and find it's already 2017 and you haven't even started training for CVGC 2017, what do you do? I'll tell you what you do - you build an emulation box and start practicing! And, because I'm such a swell guy, I'm here to tell you how you can do this on the cheap - close to, if not cheaper than, one of those mini NES consoles. Assuming you can even find one. But you won't be limited to NES titles - you'll be able to play almost anything up to PSX and has played every PlayStation game we've thrown at it.
Let me begin by saying that if you have an HDMI TV or monitor, an HDMI cable, and a USB keyboard, you can easily do this for under $100. And in less than an hour, probably. Certainly, writing this post is taking longer than I spent building the thing and test driving it with Super Metroid.
So, what do you need? I'm glad you asked! Here's a fairly exhaustive list - you likely already have most of this. All told, I spent $75, but I already had a controller to use.
- A Raspberry Pi 3
- An enclosure for your Raspberry Pi
- Power supply for your Raspberry Pi
- An 8GB or bigger MicroSD card (compatible with the Pi)
- A MicroSD card reader
- An HDMI cable
- TV or monitor which supports HDMI
- USB Keyboard
- USB gamepad
- Powered speakers (probably included over HDMI to TV (or monitors with speakers))
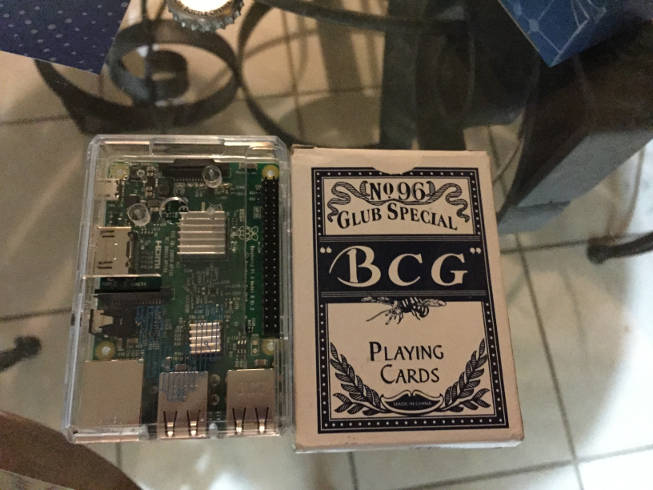
That may sound like a lot, but you probably already have the second half of the list. I bought a kit that included the first 3 things for $50 and I think you'll be hard pressed to beat that price. I am pretty sure the heatsinks it includes are optional, but the kit makes this super easy and they're nice to have. For that matter, I suppose the enclosure is technically optional. Also, if you already have an older Pi, it may work fine - they do have instructions for Zero, 1, and 2. If you don't have one, I would go straight to the 3. I have some pictures of the Pi in its enclosure at the bottom to show how small this is - it's incredible to me that I can play pretty much anything up to PSX - probably including at least a large part of PSX - on something the size of a deck of cards.
For the SD card, I splurged a little bit to get a faster one because I wanted this to boot fast. I got this number for $17, but this one for $10 would likely be just fine. I think 32 GB will be plenty for what I want, or you can go big, like notaburger, and get a 128 GB card. He said that the NES, SNES, and Genesis libraries weigh in at under 1 GB each and I'll haphazardly estimate that you can get 2 PSX discs in 1 GB. So, he should be able to easily have 200+ PSX games while I'll be stuck with a measly 50+. I think I'll survive. I don't think it's worth getting a smaller card for less than $10, but if you have one laying around then may as well try it. For the reader, I think I have one in my laptop, but I went ahead and bought this cheap guy which worked fine.
For the USB keyboard, you definitely don't need one dedicated to this. If you can borrow one from your PC for the initial set up then you should be more than fine. If you insist on buying a dedicated keyboard (like I did momentarily), then I think something like this would do the trick. But I guess you might want wireless, too, and any USB wireless will probably be plug-and-play. Bluetooth (which the Pi 3 does have) is another beast and, while it sounds like it's possible, it sounds non-trivial.
Regarding the USB gamepad, probably the simplest is a PS3/PS4 controller (I think both of those use USB) or an Xbox 360 controller (either wired or with the wireless adapter). I've mostly used my wireless Xbox 360 controller with this adapter. It does say it's authentic Microsoft on it, but I don't know if I believe it. I do know it works and was just plug-and-play for me. Also, I assume the listing had pictures when I bought it...
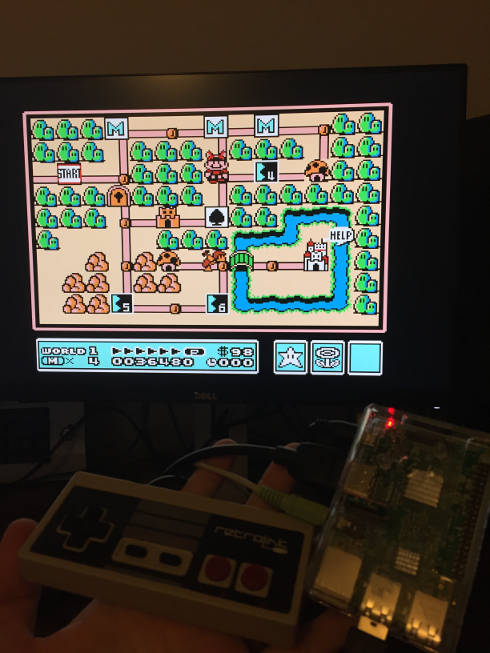
But why would you practice Mario Bros with an Xbox controller? You know damn well you'll be playing it with an NES controller at CVGC. There are lots of USB gamepads that are more or less identical to these available. For example, I played some Mario 3 with some Retrolink NES controller and it worked fine. But someone truly dedicated to winning CVGC will probably want to practice on the real thing, and there are adapters that will convert your controllers to USB, such as this for the NES. I haven't tried it, but it does seem to have great reviews. But any of the USB controllers will likely be great and, if these options aren't authentic enough for you, then why are you reading this instead of playing on original hardware?
And, if you set this up and have problems with audio, like I did, let me remind you that the speakers you use in the 3.5mm jack must be powered. I tried with some headphones first and got some faint audio and a lot of static. This was after reading that the speakers needed to be powered previously. Oops. But, it was easy to fix. And, as I said, if you're using HDMI to a TV, you'll probably get audio out that way with no trouble.
As for set up, I could copy the instructions from RetroPie's own documentation, or write some with my own witty flavor, but a hardware guide is enough for now. You can follow their steps here. They also link to a 20 minute video during which I think he literally does everything after putting the Raspberry Pi into its enclosure. It really is that simple.
Real quick, as I feel like the video did a bad job explaining one of these and didn't touch on the other:
- You don't need a USB thumb drive. You can send the files to your RetroPie console with FTP or a file share. The file share requires no set up and is what I'd recommend doing if you're using Windows. You just connect your Pi to your home network and then you can get to the Roms folder at \\retropie\roms. I did transfer Super Metroid over USB before I realized this.
- You may need to run one command on the Pi to be able to use your full SD card. Notaburger definitely did. I didn't fill it to that point, but I assume I would have, too. It was super easy, and I'll just link to someone else's instructions. The RetroPie instructions say this automatically happen the first time you boot in, but that was clearly not Notaburger's experience.